version 09 beta 2.4 | download | home | info
HELP
m2v music to video VJ-tool
version 0.9 beta 2.4
for MaC OS X!
setup
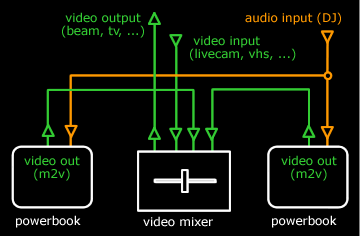
m2v is a tool for VideoJockeys (VJ). It moves animated quicktime according to life music input (from the DJ, from CD or from wherever). it does not provide any video-effects on the movie (e.g. tint or colorize etc.) this can be done with an external analog video mixer, connected to the mac. video-effects need quite intensive calculations by the computer. i keep it out of m2v to get best performance with low latency. anyway, in normal use, there is a video mixer on the set where the VJ can do any effects and mixing.
So, the ideal set would be something like this:
getting started
before starting m2v, make sure the settings for line-in (control-panel sound) and for monitor output (control-panel monitor) are correct. there should be an audio signal defined (for trying out m2v, you can use a Audio-CD). If you have a second monitor connected to your computer, m2v will open the stage on that monitor. if you haven't, the stage will be opened on a extra window. for performing, you definetly should use the second monitor.
On apple powerbooks, that is no problem, you can use the video out. be sure that you don't have "mirroring" on (it would show the same content on both monitors).
on desktop macs, you need a 2nd graphic-card (or one of these cool new cards with two outs).
i read about a possability to switch to two-asynchron-monitors even on some iBooks. you have to patch the firmware, so i won't recommend it.
now start m2v - double-click on the icon.
i think you can run m2v in classic mode (try if you like), but i would recommend booting in OS 9. I would love to make an OS X version, but i use a director Xtra (asFFT) that is free and there is no OS X version now.
source files
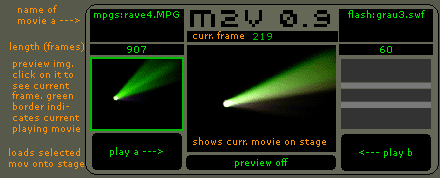 on startup, m2v scans the folder "movs" in the m2v-folder. you can put your movies in this folder, or you choose another folder by clicking on "SELECT FOLDER A" and "SELECT FOLDER B". m2v can read up to three subfolders.
all the files in the folder are shown on the left and right. by clicking on a filename, the name of the selected movie, the length (in frames) and a previewimage is shown on the respective side.
by clicking on "play a --->" or "<--- play b", the movie is loaded into the stage.
clicking on "preview on" will start the preview in the preview window (in the middle of the section).
in the beginning, the movie will be paused, so first set the step and speed to let it move.
step and speed
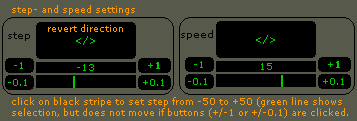 use this section to set up the step and speed. set speed to +10 (or so) to see what happens. for accurate setting of the speed, you can use the "+1" and "-1" and "+0.1" and "-0.1" buttons. for a more rough setting, just click somewhere on the black stripe to get a speed setting from -50 to +50. the big button is for fast direction-switch. what exactly the number means, depends on the movie itself and its framerate (fps). try out yourself wit your source files and you will see.
setting up the step size is basically the same. what "step" means and what it is for, is explained in the section "frequency setup".
movie timeline
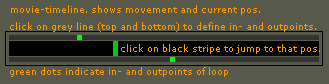 The green bar in the middle shows the current position relative to the full movie. as the movie continues, so does the bar. you can jump to any position of the movie if you click on the black stripe in the middle, and you can set loop-in and loop-out points with clicking on the grey stripes at the top and the bottom.
frequency setup
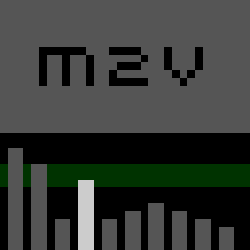
 this section provides the unique features of m2v: life-audio-input is drawn in frequency stripes.
you can select a frequency by clicking on it (color changes to orange).
the green bar defines the intrusion level.
if the orange stripe moves into the green bar, a step is released.
that means, the movie is moved an amount of frames, defined in the step section.
for best explanation, try the following: in the speed and step section,
set speed to something like 15, and step like -10 or so. now,
the movie should move forward, and backward when the selected frequency is in the green range.
this appears to produce a kind of video-scratch-feeling. try it out!
this section provides the unique features of m2v: life-audio-input is drawn in frequency stripes.
you can select a frequency by clicking on it (color changes to orange).
the green bar defines the intrusion level.
if the orange stripe moves into the green bar, a step is released.
that means, the movie is moved an amount of frames, defined in the step section.
for best explanation, try the following: in the speed and step section,
set speed to something like 15, and step like -10 or so. now,
the movie should move forward, and backward when the selected frequency is in the green range.
this appears to produce a kind of video-scratch-feeling. try it out!
mode sets the trigger-mode.
"stepmode" works like described above. "swapmode" sets the trigger to change between movie a and movie b.
depending on your
computer system and the speed of your machine, this returns some quite cool effects.
"disabled" will trigger more cool features in the future!